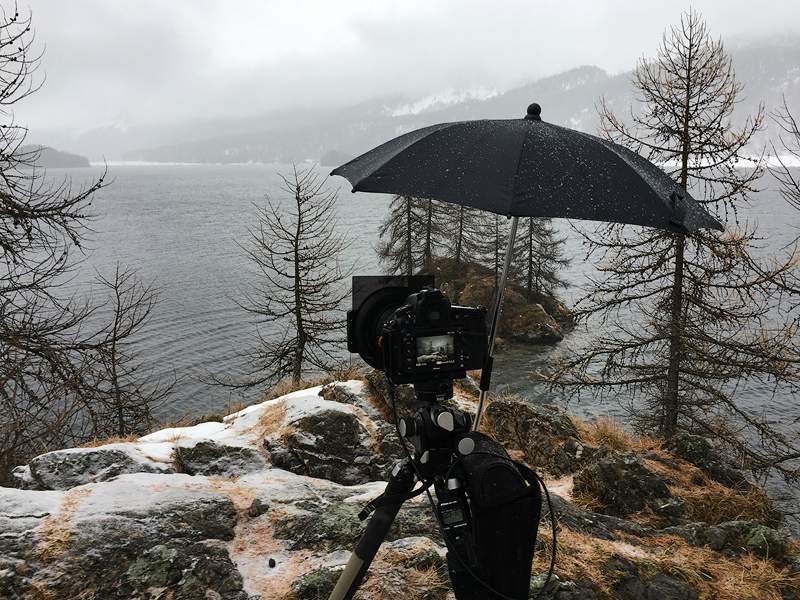
Which landscape photographer has never thought before about protecting his equipment with an umbrella for photographers? A few years ago I developed a small project from these thoughts, which I finally put into practice. I was thrilled (and still am) with thSooner or later, every landscape photographer wonders how to protect their equipment in the rain — and an umbrella is often the first idea that comes to mind. A few years ago, this thought developed into a small project of my own, which I eventually put into practice. I was delighted with the result — and still am — although I was often met with rather sceptical looks because of this unusual umbrella. Yet whenever it started to rain, I was the one smiling, happily continuing to take photographs while others had to pack away their equipment.
Long exposures in particular can be difficult to achieve in wet conditions. After a recent photo tour in the Bernese Highlands of Switzerland, several people asked me how such a tripod umbrella could be recreated. That seemed like the perfect opportunity to write a blog post about it. In this guide, I will show you how to build such an umbrella yourself, how to mount it on your tripod, and which components I used to put it together.
Of course, photographer’s umbrellas are nothing new, and I certainly cannot claim to have invented the idea. However, none of the prefabricated solutions available on the market ever really convinced me. And anyone who knows me is aware that if a piece of equipment does not exist in exactly the form I want, I will keep adapting it until it fits perfectly into my kit.
The Search for the Right Piece of Equipment
My search for a suitable solution began with related products — for example umbrella systems designed for prams, golf trolleys and even walking frames. However, these accessories were often either too heavy or too bulky, inflexible and unstable. Anyone who does not have to carry an umbrella on long walks is unlikely to pay much attention to weight. In addition, I simply could not find a suitable mount for the tube diameter of my tripod. Even so, the general concept of pram umbrellas came surprisingly close to what I had in mind for a tripod, so they provided a useful starting point.
The ideal umbrella needed to meet several requirements: it had to be well made, lightweight and easy to mount. At the same time, it had to be large enough to protect camera and lens from rain, yet compact enough not to offer too much surface area to the wind. In other words, it felt a little like squaring the circle. The question was whether all of this could really be combined in a single umbrella.
At first I bought a Chicco stroller parasol. I found it in a big department store around the corner. For my purposes the holder seemed almost dauntingly chunky, but the umbrella surface size itself was opaque, color-neutral and had good UV protection. The diameter of 70 cm also suited my needs. I was particularly impressed by the two hinges, one just below the slider and another right above the bracket. Thanks to the upper hinge, the parasol can be tilted out of the field of view of a wide-angle lens if needed without affecting the angle of the tube. In this way, a lot of different positions can be realized. Over the years of use, I realized the importance of this flexibility in practice.
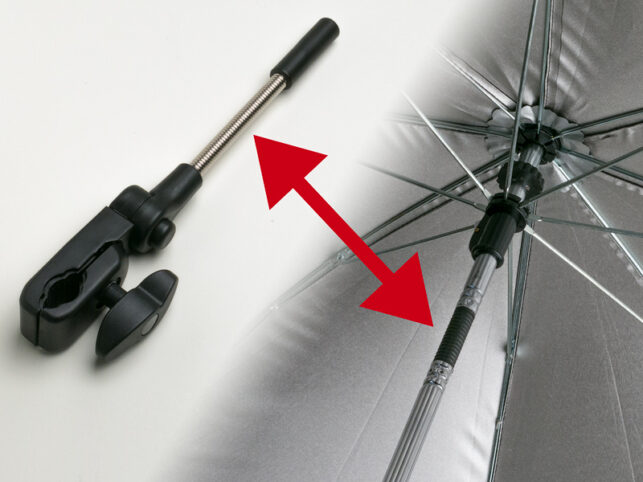
If I could remove the original clamping mechanism without damaging the bracket and replace it with a better solution, the result would be exactly what I was looking for: a high-quality, flexible umbrella that could be mounted easily to the tripod and handled quickly in a wide range of situations. What more could I ask for? The next challenge, then, was to find a suitable clamp and work out how to combine the umbrella shaft with the front derailleur clamp.
The Long Road to the Perfect Clamp
Most ambitious landscape photographers use a carbon-fibre tripod. Such tripods offer two invaluable advantages: they are lightweight and highly resistant to vibration. At the same time, however, carbon fibre is not only expensive but also relatively sensitive. For that reason, the clamp had to meet two requirements: it needed to hold the umbrella securely while at the same time protecting the tripod from damage.

After a very long search in all sorts of directions, I eventually came across front derailleur clamps for bicycles. Bicycle seat tubes have several fundamental similarities to tripod legs: both are round, both have comparable diameters, and both are often made of carbon fibre. That was the key idea. Front derailleur clamps are designed to grip the seat tube evenly and securely without causing damage. For that reason, they also seemed perfectly suited to use on a carbon-fibre tripod.
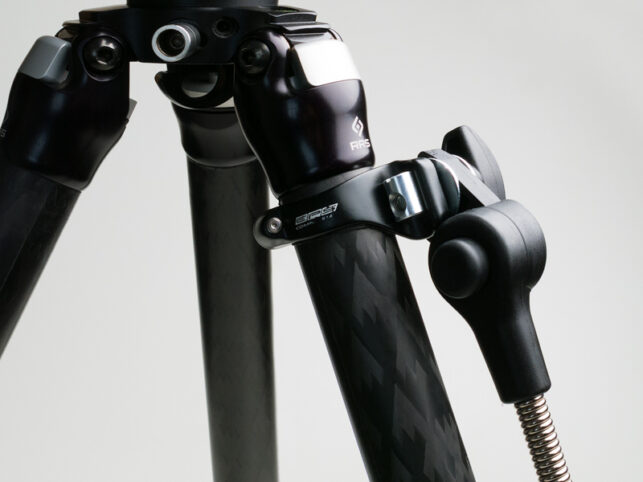
Even so, some caution is required during assembly. So here is the necessary disclaimer: anyone attempting to recreate and use my umbrella system does so at their own risk. To reduce the chance of damage, I cut a protective pad to exactly match the inner surface of the clamp (see image above). This allows the clamp to hold very securely while preventing scratches to the carbon fibre.
Of course, it would have been too easy if the search had ended there. Unfortunately, things turned out to be a little more complicated. Just as bicycle seat tubes come in a wide range of diameters, so do tripod legs. Everyone seems to follow their own standards. In the end, success depends largely on whether you can find a front derailleur clamp that matches the diameter of your tripod. So a certain amount of personal effort is unavoidable if you want to reach the goal.
For my Really Right Stuff TVC-24L Mark II, I use the DC12 clamp from Campagnolo, the Italian high-end manufacturer. It is available in two sizes, for diameters of 32 mm and 35 mm. Perhaps it will fit your tripod as well — and if so, all the better. The diameter of my tripod leg measures 33 mm, and the clamp with the 2 mm larger diameter fits perfectly. As mentioned above, a thin protective pad can help if needed, for example one cut from an old bicycle inner tube.
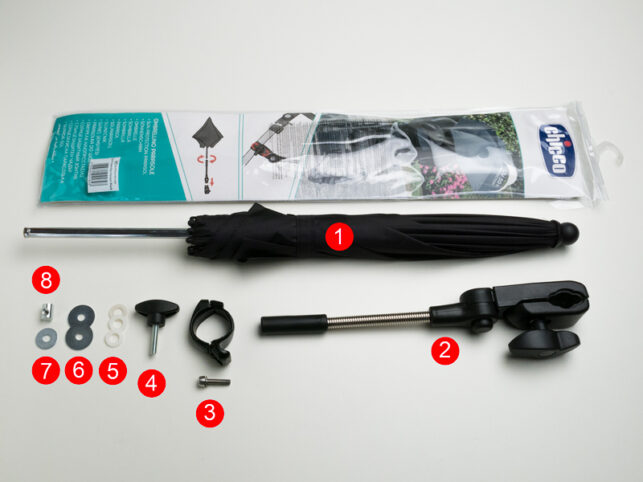
Once these two main components have been purchased, it is time to move on to the remaining items on the shopping list:
- (1+2) 1x Chicco Sun Protection Parasol Black with 50+ UV Protection
- (3) 1x Campagnolo DC12 Front Derailleur Clamp
- (4) 1x Wing Screw D=40 mm M6 x 26
- (5) 3x Washers DIN 125 polyamide
- (6) 2x Fender Washers 6,4 x 25 zinc-plated
- (7) 1x Fender Washers 6,4 x 20 zinc-plated
- (8) 1x Round Nut M6 10 x 14 x 8 zinc-plated
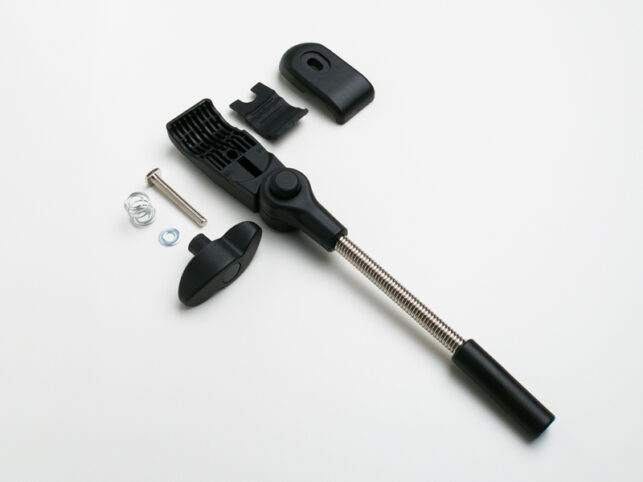
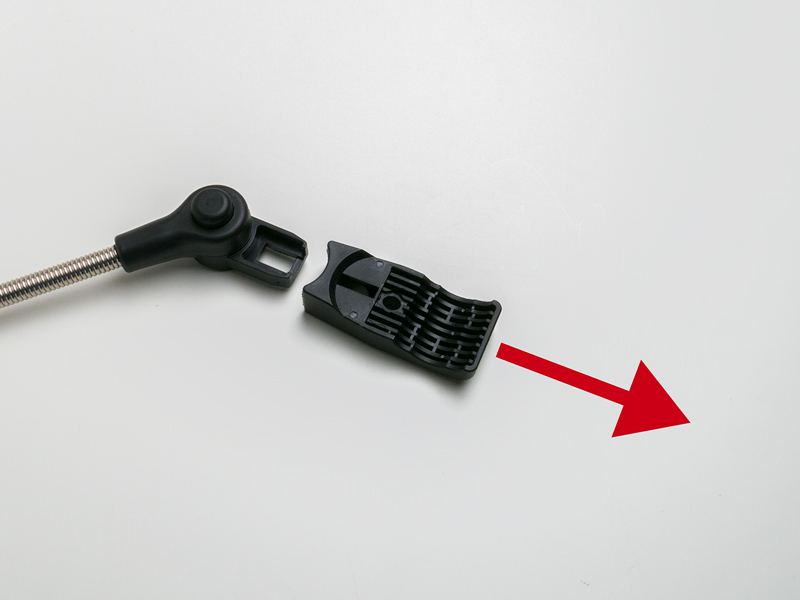
Before you can begin the assembly, two preparations are necessary. First, disassemble the original clamp and remove all of its individual parts. Start by turning the wing screw counter-clockwise until the handle itself comes free from the thread. Contrary to what one might expect, the threaded rod and its square end piece are made as a single unit, so the screw can only be removed by turning the wing screw itself. Once this has been done, the threaded rod can be pulled out and the entire mechanism dismantled, as shown in the image.
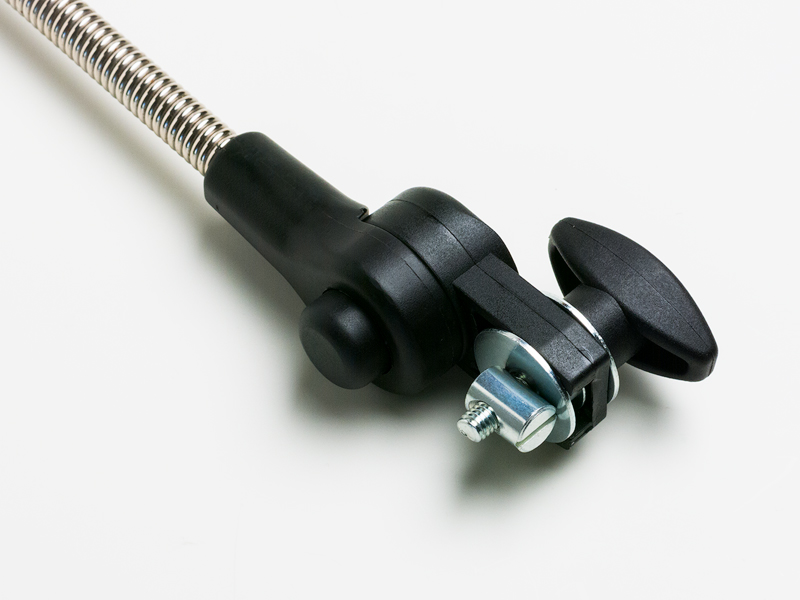
The second step is to remove the bulky outer casing (see the second image). In the end, only the bare swivel remains.
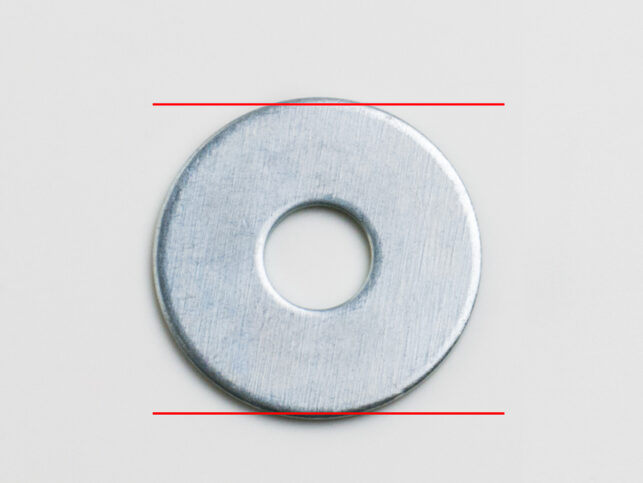
Next, file down two sides of the fender washer (7) slightly so that it fits perfectly into the vacant recess in the holder. This can easily be done with a rasp while holding the washer with a pair of flat-nose pliers. Alternatively, it can be secured in a workbench or vice while being worked on. Once this has been done, the preparatory phase is complete and all parts are ready for assembly.
Detailed Assembly Instructions
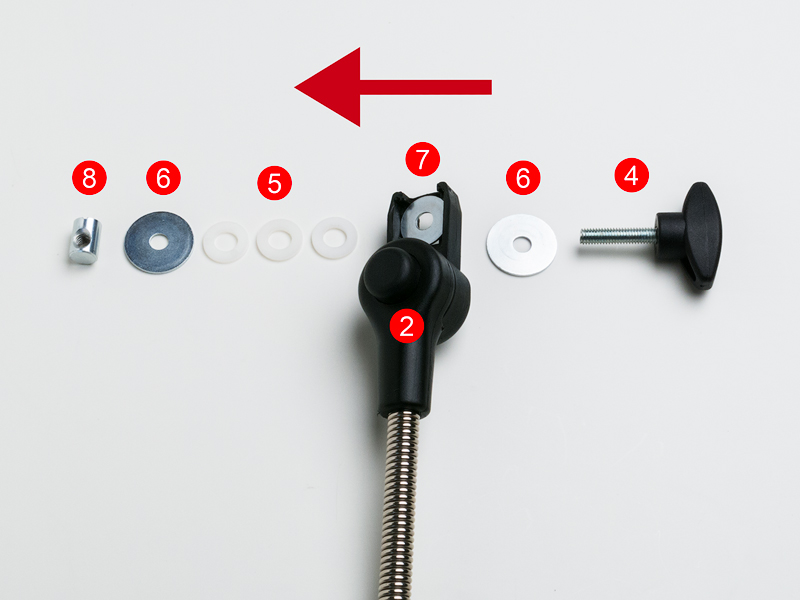
First, place the modified fender washer (7) into the space that was freed up when the original bracket was removed. Then take the wing screw (4) and slide one of the large fender washers (6) onto the threaded rod. Next, insert the rod from behind through the bracket and place the three polyamide washers (5) onto the front. The second fender washer (6) completes the assembly at the front, and to finish the job, simply screw the round nut (8) onto the thread. That’s it.
Mounting It to the Front Derailleur Clamp
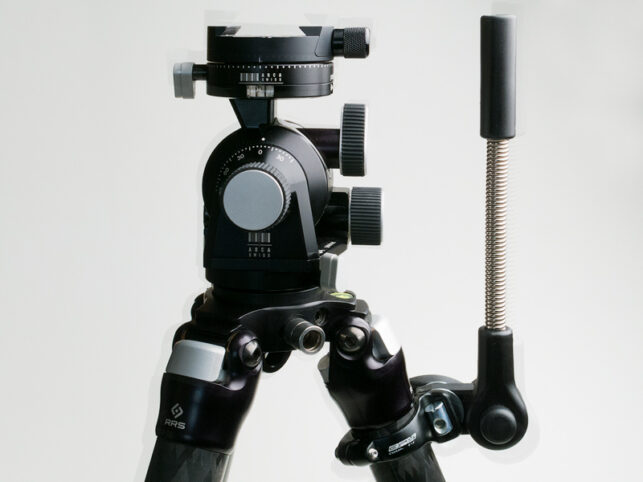
I always keep the bracket and the umbrella separate in my camera backpack. The front derailleur clamp, however, remains permanently attached to the tripod, as it is both light and compact and does not get in the way when handling the tripod.
Attaching the bracket to the front derailleur clamp is very straightforward and hardly needs any further explanation. Simply loosen the round nut, taking care not to lose any of the individual parts. Then insert the screw through the flat side of the clamp and tighten the wing screw until the round nut is firmly secured. In rainy conditions, I often attach the bracket at home before heading out.
One small note: the thread of the wing screw may seem rather short if you want to fasten the umbrella very securely. However, there is no need to worry — the round nut holds the bracket without any problems. If you prefer a little more thread length, you can use the 41 mm version of the wing screw and shorten it to the desired length.
Optional Umbrella Modifications
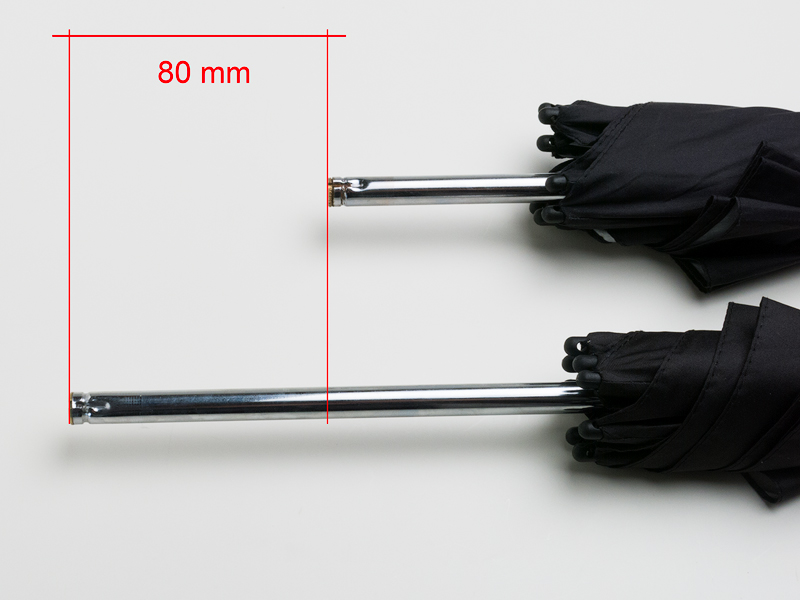
At this point, the umbrella can simply be screwed in and is ready to protect your gear from rain and sun. After using it for a while, you may find that you want to shorten the umbrella shaft to better suit your personal preferences. I shortened mine by 80 mm for two reasons: first, I prefer a shorter distance between the lens and the umbrella; and second, once shortened, the umbrella fits perfectly sideways into my f-stop Lotus. For my needs, that turned out to be the ideal solution.

Shortening the umbrella shaft is quite straightforward. First, carefully cut the shaft to the desired length. Then remove the brass threaded insert from the piece that has been cut off. This insert can then be fitted into the new end of the shaft and secured with a light, precise tap from a hammer applied via a flat-blade screwdriver.
For the purpose of this article, I weighed the complete umbrella system. Including all components, it comes to just 369 grams. Compared with other solutions currently available on the market, I think that is a very respectable result.
- Campagnolo DC12 front derailleur clamp 28 g
- Adapted bracket 143 g
- Chicco parasol, shortened 198 g
Final Remarks
If you have made it all the way to the end of this guide, you may also be willing to invest the effort required to recreate this genuinely useful piece of kit. Thanks to its solid and reliable construction, the umbrella has proved to be a dependable companion in all kinds of weather. I have come to value it greatly and would no longer head out on a photographic trip without it.
Thank you very much for your interest in my blog — and as always, I wish you good light.
