Ambitious landscape photographers use a wide range of techniques to create very specific images, such as neutral density filters and graduated ND’s or hyperfocal distance and panoramic photography. All these techniques require precise preparation and extensive experience in order to avoid mistakes and possibly missing the best light of the day. Many of us love to use neutral density filters and we know that the nominal density factor often deviates from the actual one. In order to attain the biggest field of depth, one has to ascertain the hyperfocal distance. If one prefers creating panoramas, then knowledge of the nodal points is essential for the used equipment.
I, like so many others, use these techniques and tools for many years already. In order to better organize my system, I created an exposure table for each of my ND filters. Then I added all nodal points of my system and finally, I established a list of my hyperfocal distances. I included another lists with all three exposure variables: aperture, ISO and exposure time, in order to quickly calculate equivalent exposure times.
I was able to work well with these charts for awhile, but I really wanted a more hand-sized solution. Therefore, I resized all the lists, printed them in pieces and put them together in a transparent foil for weather protection. However, I had to re-work all the lists every time I modified my equipment, so all that became tedious. I decided a few months later that I would transfer all the lists and notes onto my computer and create one sheet for all purposes.
There were many requirements: the final product should be clearly arranged with a nice surface feel and should fit into my Lee filter bag. In addition, I wanted better protection from environmental influences, without the need for electrical power. Finally, I desired to have all filter values and hyperfocal distances calculated and displayed completely by formulas, without using the time format XX:YY:ZZ. I found this format unsuitable for this purpose. After much time and determination, I finally succeeded in finding a way to meet all the pertinent criteria. I was so pleased with the result that I wanted to share it with you! By clicking on the link at the end of the article you can download a personal copy. I hope it improves your photographic journey, as it has for me.
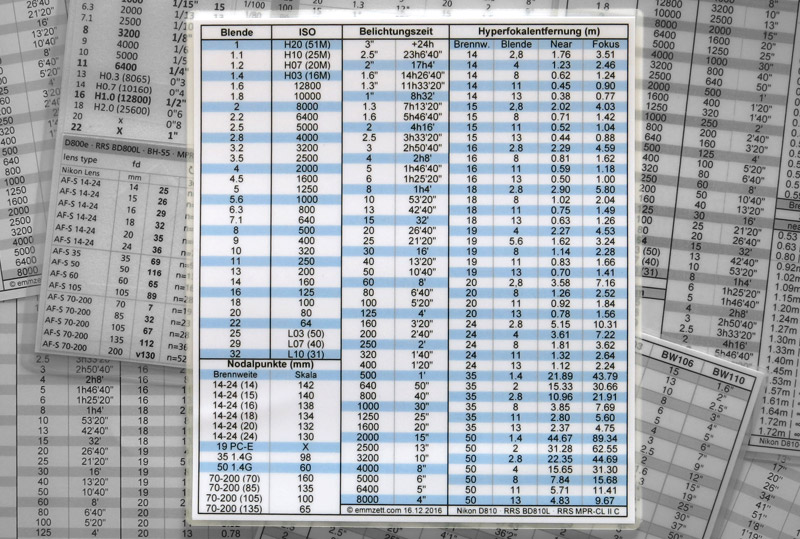
What does the Photo Sheet contain?
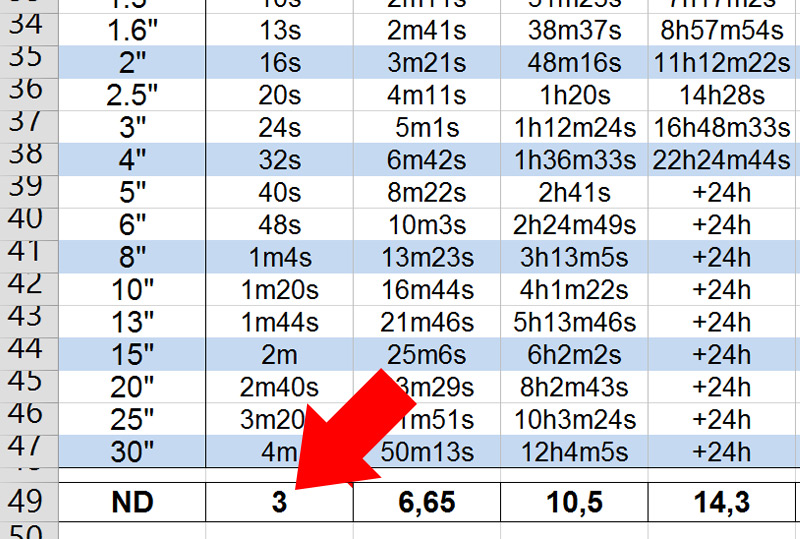
The front side displays exposure times for up to seven neutral density filters. This sounds like a lot for beginners, but I think this should meet the needs of most landscape photographers. The column to the left shows the exposure times for the reference shot without using a filter. I have chosen the time format suitable to the displays of most modern digital cameras.
Once the actual neutral density has been evaluated, it can be entered in the lowest line of the corresponding column. All exposure times were automatically calculated up to 24 hours. Of course, the extension factor can also be determined in an opposite way by estimating a factor and then checking whether a certain exposure time can be achieved with it. In order to ensure the highest possible accuracy, the control of the extension factor is possible very precisely on two comma points.
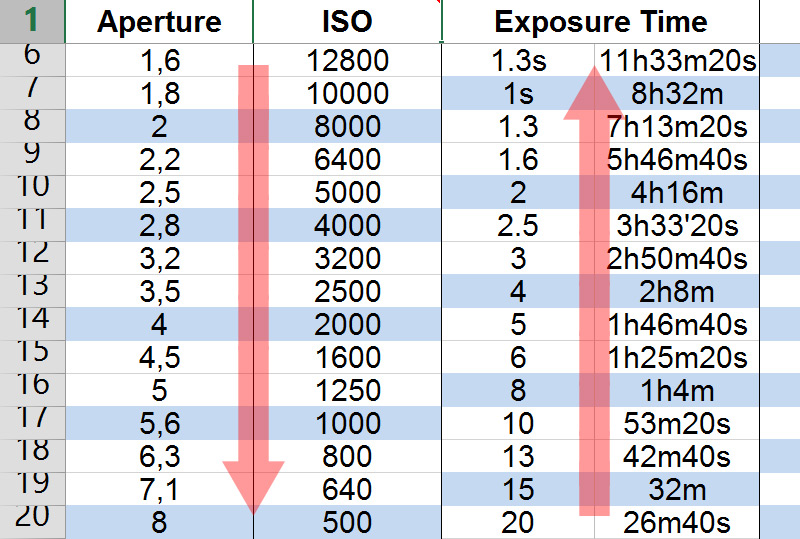
Aperture, ISO and Exposure Time
The Photo Sheet’s back is composed of several tables for different purposes. On the left there is a three-column listing containing the three exposure variables aperture, ISO (corresponding to the Nikon D810) and exposure time. For me, it is an important instrument to find equivalent exposure values. I have arranged the columns’ direction in a way that all values can be read intuitively, in other words, values on top leading to brighter images and results, and values lower down leading toward a darker image. The full stops are marked with color to make the calculation easier and to avoid calculation mistakes.
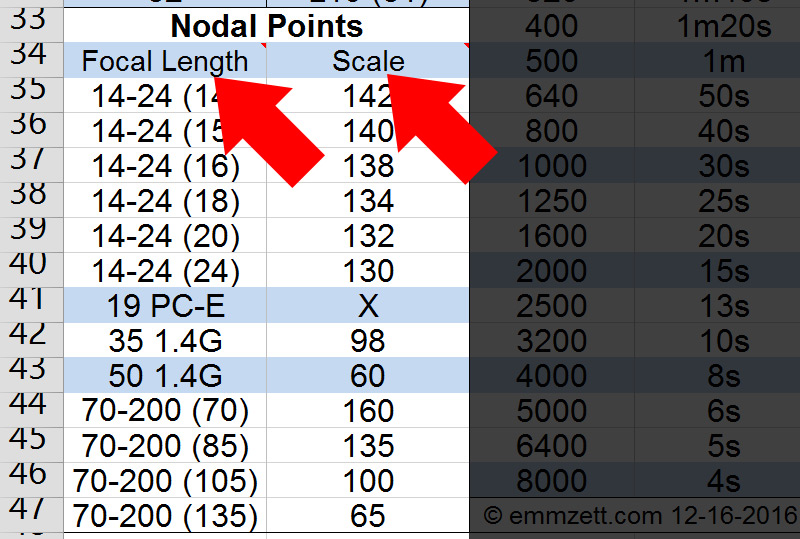
Nodal Point Table
Bottom left there is some space to write in focal lengths and corresponding nodal points. Each system of camera and lens at a certain focal length has a neutral optical axis, the nodal point. Panorama rails or nodal point adapters usually come with a scale that allows to position the camera exactly in a point-to-point direction and to find Nodal points again and again. As you can see, my lens data is placed on the left and the nodal points on the right. These values refer to my combination Nikon D810, Really Right Stuff BD-810L and MPR-CL II C. That’s why I noted the equipment also on the sheet.
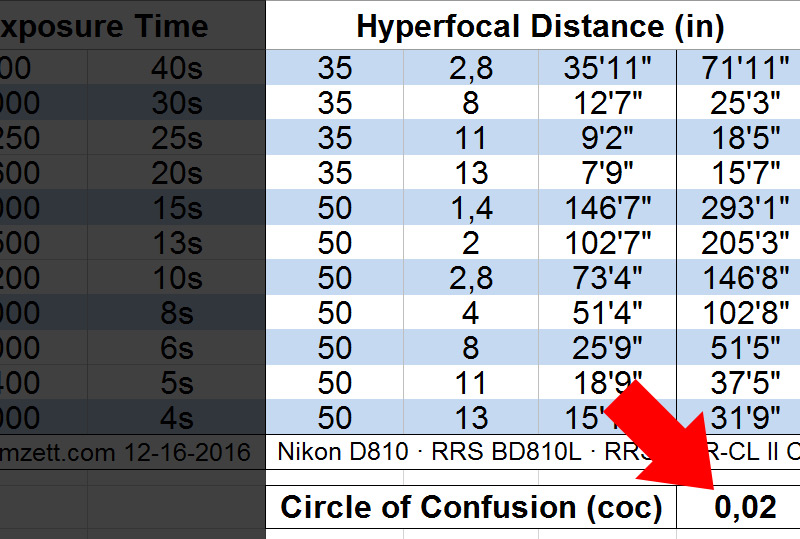
Hyperfocal Distance
It is going beyond the scope of this article to explain what it is in the so-called hyperfocal distance. For landscape photographers it is important to know when there are important elements in an image, in the near foreground and in the distant background, which should be in focus. Within certain limits, this can be achieved by focusing on a particular point behind the foreground object and so get the whole scene in an acceptable sharpness. The table on the right side calculates the distance from the camera to this point, depending on a specific focal length and aperture. For automatic calculation, it is sufficient to fill in this two data in the corresponding columns. For my calculations I use the circle of confusion of 0.02 mm, the recommended value for full frame digital cameras. Those who prefer a different value can enter it at the bottom right.
That’s all the work. Now just print, cut and have the table laminated. For the color selection, I have made sure all values remain easy to read even in difficult light conditions, such as in twilight or under the red light of a headlamp. For a high life expectancy, to avoid reflections and for a pleasant touch, I recommend a lamination with matt foil. You can have it done for a small cost at a specialty store, or do it yourself with a laminator, e.g. the Olypmia A230.
Last but not least! The reason that I am able to share this new Photo Sheet in such quality is that a friend and photo buddy of mine, Dirk Wiemer, from Dirk Wiemer Photography supported the project and provided the Photo Sheet with his important inputs and complex formulas that calculate and display all the neutral density values. Thanks a lot for your valuable support! The Photo Sheet can be downloaded in excel format (.xlsx) here.
Have fun and always good light!